
How to Start in Freelance Photography 6 Tips
December 19, 2020Learning how to remove background from image in Photoshop is a crucial step in becoming a pro designer. This skill can take you a long way. So you will get step by step guide on how to remove background in photoshop from this article.
When you are creating graphics, sometimes you need to cut out a part of an image to use it in your design. You might also need to make the background invisible to use only the image. Whether it’s logos, photographs, or posters, learning how to make the background transparent in Photoshop can come in very handy.
Photoshop comes with various tools that can help you remove background from an image. There are several built-in tools that are designed to make the process easier.
For instance, the Background Eraser Tool is widely popular. But sometimes it removes pixels from the image as well. If your image has fine details, the built-in background removing tools can produce a rather choppy final result. If you want to maintain the quality of the image then we recommend using the Pen Tool.
How to Remove Background in Photoshop using Pen Tool?
One of the best tools in Photoshop for making the background of an image transparent is the Pen Tool. It is not the easiest tool to use, but it can preserve the quality of the image and allow you to crop out images with fine details.
Let’s take a look at how you can remove background from image using the Pen Tool.
Step 1: Open the Image
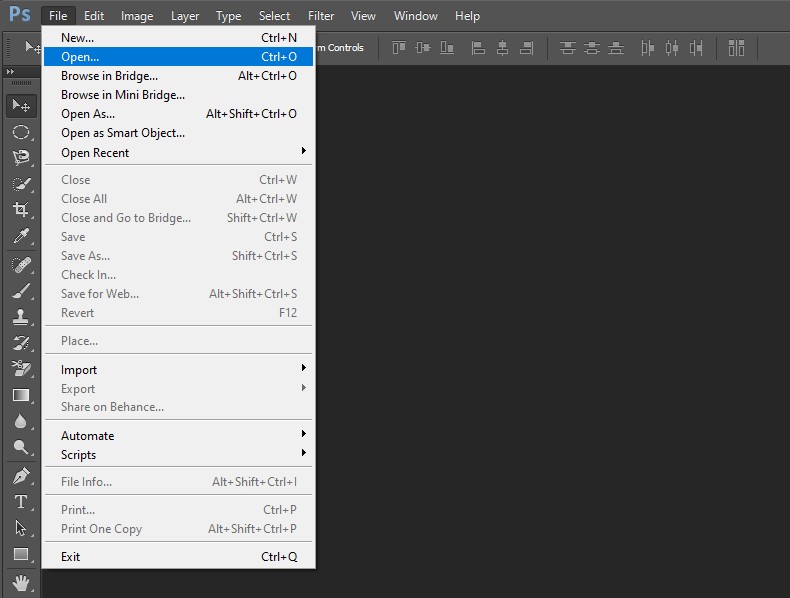
The first step is to open the image in Photoshop. Go to File-> Open (Ctrl+O) and select the image file you want to remove the background from.
Step 2: Select the Pen Tool
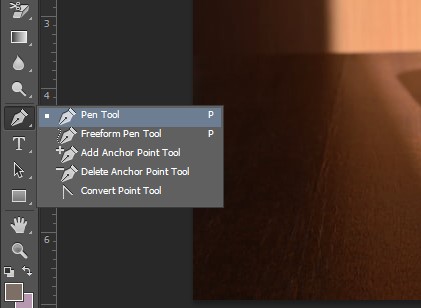
Now that your image is open, we can proceed to remove the background from it. To do so, select the Pen Tool from the Tool Bar or Press “P”.
If you right-click on the Pen Tool, it will open a menu that features several options related to the tool. You can add or remove anchor points. Click on the topmost option that says “Pen Tool”.
Step 3: Draw a Path
Once you have selected the Pen Tool, you can click on any point on the boundary of the image. This will be the first point of the path.
Zoom in to see clearly and keep adding anchor points to your path. Draw it all around the boundary of the image. This takes some time, so be patient and do not mess up.

If you make a mistake you can go to the Pen Tool in Toolbar, and click on “Delete Anchor Point” to remove the points that you do not want in your path. Or you can simply Undo by pressing “Ctrl+Alt+Z” on the keyboard.
Step 4: Close the Path
After you have drawn the boundary of the image, you must close your path. This is only possible if you join the last point with the starting point of your path. This anchor point will then white.

Step 5: View Paths Panel
Once you have completed your path, you are now ready to remove the background from image. But first, you must turn on the Paths Panel to see the path you have selected.
Go to Windows and find the option that says Paths. Click on it to view the Paths Panel.
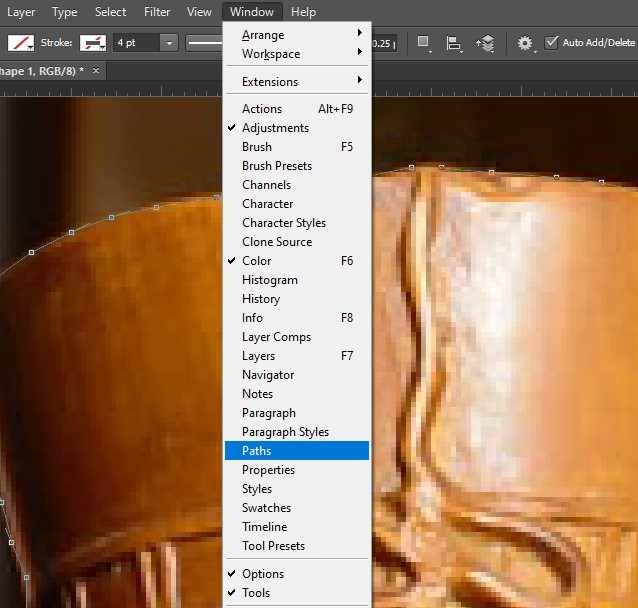
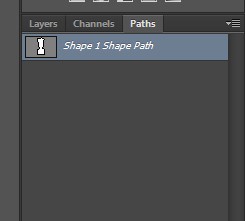
You will now notice a Path Panel on the right side which normally shows the Layer Panel. There you will you the path you just drew with the Pen Tool.
Step 6: Convert it to Selection:
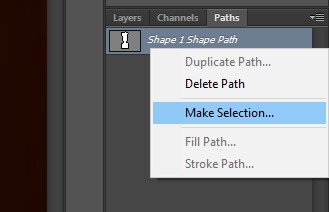
To make your background transparent, you need to convert your path to selection. Right-click on the path in Path Panel and find the option that says “Make Selection”.
If you click on it, this will open a new message box. Click ok and your path will immediately convert into a selection.
Step 7: Duplicate Background Layer:
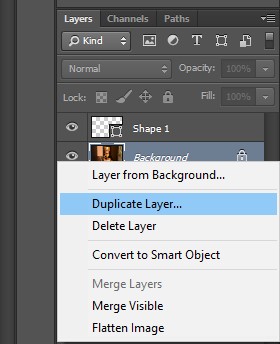
Photoshop does not allow you to make changes in the locked background layer. If you open an image, it automatically appears as the Background Layer in the Layers Panel.
To remove the background from it, you must duplicate it. Go to the Layers Panel. Right-click on the Backgrounds Layer and click Duplicate. Name it whatever you want and click Ok.
Turn off the visibility of the Background Layer as you no longer need it.
Step 8: Inverse Selection:
Now go back to the path that you converted into a selection. To remove the background, we can inverse the selection to select the background all around the image.
Go to Select menu on top. Click on the option that says “Inverse”.
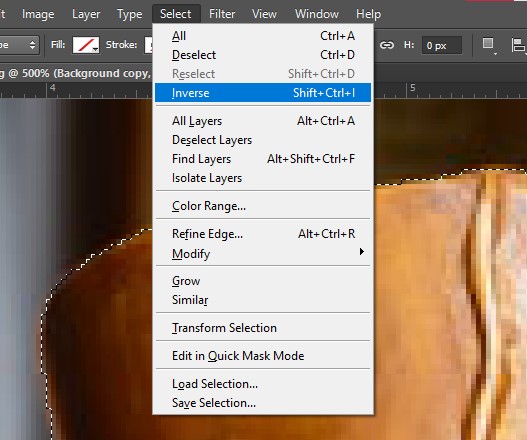
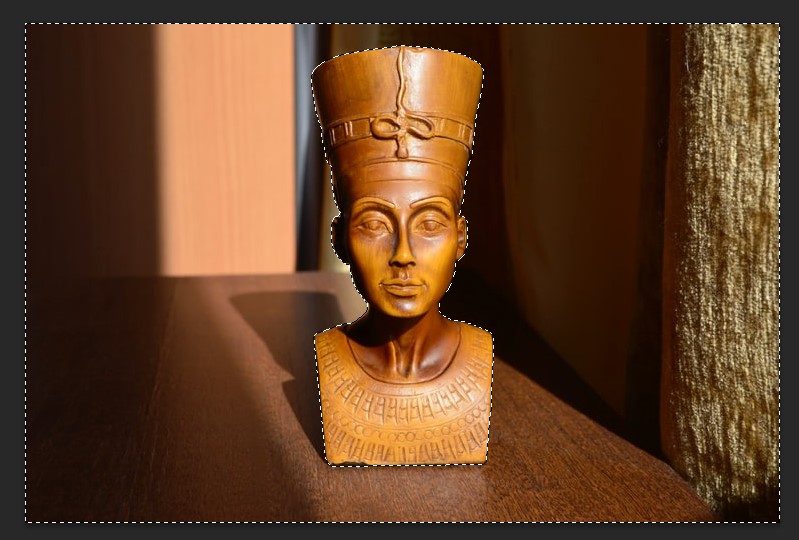
Once you do this, the background portion from the image will be selected.
Step 9: Delete Background:
Now you are ready to remove the background from image in Photoshop. The next step is pretty simple. With the Duplicate Background Layer selected from the Layers Panel, press Delete on the keyboard. Instantly the background will disappear from your image.

Step 10: Save Image:
Once you have removed the background, you are free to use this image anywhere you want. But first you must save it.
The right format for an image with a transparent background is PNG. You can use a PNG image in Photoshop and other software and it would not add a white background to it as in the JPEG format.
Go to File->Save as. Select the PNG format from the dropdown menu while naming it and click Save.

That’s it you have successfully made your background transparent.
Watch The full video:
Final Verdict
Using the Pen Tool requires practice. It also needs a good grip on the mouse. But it is also one of the best methods to remove background from an image in Photoshop. It is preferred by professionals all over the world.
With the Pen Tool, you can smoothly remove the background from an image in photoshop. It is particularly great for images with fine details. Once you save your image as a PNG, you can use this anywhere.
We hope this tutorial was helpful. Keep practicing to get better at using the Pen Tool to make the background transparent in Photoshop. Background Remover Photo is offering you 100% handmade background removal services at an affordable price.




1 Comment
Great post about background remove via photoshop:) really I enjoyed it.